
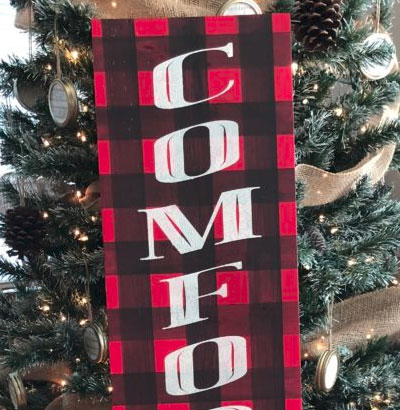
Buffalo check was BIG last year, and it’s still hot this holiday season. When I was teaching sign painting and selling wooden signs and crafts, buffalo check and plaid were two of the most requested patterns. I thought since we’re all getting into the holiday spirit, why not go ahead and share it with you here?

Step 1: Paint your background color
The first step is to cover your surface with your background color. This will almost always be your lighter color. Allow this to completely before you move on.

Step 2: Use painter’s tape to create the first set of lines

Start putting down your painter’s tape, being careful to make sure the edges are totally sealed (There is literally nothing more frustrating in the world than paint bleeds. Except for wet pant legs, maybe. And soggy cereal. And textured walls/ceilings (hi Dad!)). If you want your lines to be evenly spaced (and if you’re doing plaid or buffalo check, you do), take a small length of painters tape and use it as a spacer between your lines.
Step 3: Paint your darker color

Here’s where the magic begins to happen! You obviously don’t want to have a solid black line, otherwise, you’ll end up with a piece that appears to be all black with floating red squares. The trick here is to paint your second color on sparingly, one line at a time.

Immediately after putting the paint down, take a damp paper towel (you don’t want it too wet, or it can cause your paint to bleed*) and rub it over the paint down the length of your line, to create subtle streaks that appear to be going the direction of your line. This step takes a little trial and error to get your plaid stripes all a consistent color, so don’t be afraid to play with it a little bit. Once you’re satisfied with the color, let it sit 5-10 minutes, and remove the painter’s tape (while the paint is slightly wet). Again, allow this to completely dry before you move on.


Step 4: Tape in the opposite direction

Using the same method you did before to evenly space your painter’s tape, create your next set of stripes that will run the opposite direction. Again, make sure your tape is sealed down really well!
Step 5: Paint
Once again, you’ll paint your darker color and use a damp paper towel to remove excess paint. As you go, you’ll notice the parts that overlap with the first set of painted stripes are slightly darker- this is perfect! This is exactly what we want to create the buffalo check pattern. Again, wait 5-10 minutes and remove your painter’s tape.
Step 6: Admire
She’s a beaut, Clark! *This is where I would love to share a picture of my finished sample for you, but remember how I said not to use too get the paper towel too wet, or the paint might bleed? Yeah, that totally happened. It went in my “to be sanded and repainted” pile, for a later date.
Go ahead and write your favorite Christmas saying on it, use it to hang Christmas cards, whatever your little heart desires. Just make sure you share them with us, so we can see your creativity!