
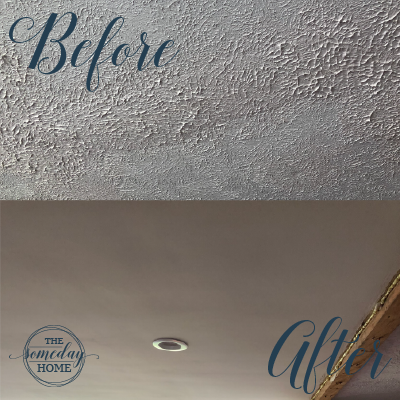
Today, in installation 2 of our Living Room Makeover series (check out our Demo Day(s) post for installation 1), I want to talk with you about a very serious matter. If you’ve been here a while, you already know it’s near and dear to my heart: texture. Specifically, ceiling texture.
My dad and I can barely get through a family holiday together without an all-out feud over the merits of smooth vs textured walls, but textured ceilings? Forget about it. (For the record, I’m the one who is avidly anti-texture when it comes to my walls and ceilings). Now, if you’ll recall from my previous post, some of the ceilings in my house are heavily textured. And not well. I’m talking, uneven, thick, hideous texture. It looked a bit like an upside-down topographical map of a mountainous area, with some lower, easily-climbable mountains stretching across most of the surface, and then thicker, taller, death-trap mountains clustered together, in a way that was strangely linear, and correlating with the placement of our drywall seams… hmm…

When we moved our stairway to the living room, I knew I would eventually need to move the ceiling fan to center it over the actual living room space, rather than the space as a whole. I would also put a light above the stairway area. Nate had been wanting more light in the living room area, also, and so we considered adding some recessed lighting.
We knew that if we were ever going to get rid of the texture on our ceiling, now was the time. Our walls were already naked and the whole area was already a complete mess. Now, I will admit something here that I’m not proud of. I wanted to take the “easy” way out on this one. I had never de-textured (??) a ceiling before, but I was certain it wasn’t going to be a walk in the park. I had read numerous articles about installing planked wood sheets over the top of textured ceilings, and I really thought that was what I wanted to do.

Perfect, right? Except… there was a catch, and we didn’t realize it until we cut the hole in for the new ceiling fan. The ceiling, much like all of the walls in this house, was triple-layered. (Of course… I swear the drywall in this house will continue to haunt my life even after it’s all eradicated!) I was still all for slapping some thin 1/4” wood planks on the ceiling and calling it a day, but Nate thought it was probably not wise to add another layer of “stuff” to our ceiling. Plus, it was going to be difficult to tell for sure where the studs were to be able to nail into them. Also, they added part of our living room at some point long ago (obviously not after stippled ceilings went out of style), and the studs begin to run in the opposite direction in that area. All in all, we weren’t certain that adding something else to the ceiling was for the best. So, we began researching methods for removing ceiling texture.
Removing Ceiling Texture
We put some effort into our research, but not because it’s a complex process. Honestly, I think we were just dreading the mess and we were hoping to stumble across some sort of a unicorn solution that not many people had found and therefore wasn’t highly publicized. Spoiler alert: it doesn’t exist. Removing texture from a ceiling happens probably exactly the way you expect it will.
For the most part, we found two different methods for removing texture. From what we read, it seems like both are equally back-breaking, monotonous, and messy, so it’s just a matter of preference. You can either take a power sander and sand the texture off of your ceiling, or you can wet it and scrape it. Ultimately, we chose to wet it and scrape it, because although you still end up with a mess there is less dust in the air and you aren’t maneuvering a somewhat-weighty power tool over your head. My sander is kind of heavy, anyway.
We used a pump sprayer that we picked up at Menards to wet the ceiling in 2 x 2’ sections, allowed it to absorb for 2-5 minutes, and then removed the texture with drywall taping knives. Our living room area is somewhat large, so we had plenty of area to cover to perfect our technique. We found that letting the water soak in for longer than 5 minutes generally wasn’t helpful, even in areas with thicker coats of texture. Also, using too much water sometimes resulted in some torn drywall paper, so it was best to work with as little water as we could.

It took us 3 days to get all of the texture off of the ceiling, but that was with working at it in the evenings after the kids went to bed, and Nate working at it by himself all day on a Saturday. All in all, the texture removal process was messy and kind of a pain in the butt, but it wasn’t hard, and it definitely beat the next step: re-mudding and sanding.

Let me be clear: mudding and sanding walls is not fun. I used to think it was the worst thing in the world to do. I was wrong. Doing the same monotonous task over and over, but doing it above your head and having to stop every 10 minutes to move the step stool you’re standing on make ceiling mudding the absolute worst job I’ve done to date.
Mudding, Sanding, and Painting
The steps to getting a smooth finish on your ceiling are the same as getting a smooth finish on your walls. Start by applying thin coats of mud with your drywall taping knife (I like using one that is at least 12” wide or wider because it’s that much more space you can cover in one swoop), being careful not to over-work it. The thinner you apply it, the more quickly it dries, so it’s important not to continually work over it- if you try to make a pass over it when it’s partially dry, you’ll end up peeling parts of it up. Don’t fall into the trap of trying obsessively to get it completely smooth when you apply it. It’s okay if there are a few streaks or raised areas at the edges of your taping knife; those will sand out fairly easily. Once you’ve got your whole ceiling covered, let it dry and inspect your work. You’ll most likely need to do more than one coat of mud (we ended up doing three), and it’s always a good idea to lightly sand any problem-areas between mud coats.
Each coat of mud that we applied was mixed with water to varying degrees. Our first layer of mud was the thickest, with just enough water added to create more of a smooth, pottery clay-like substance. The second coat was thinned out even more, and the third coat was the most watery, almost like a pancake batter consistency.
By the time you get your final coat of mud on the ceiling, you should have a pretty good idea of where your trouble spots are, and it’s just a matter of sanding and applying touch-up mud as necessary. We finished the whole thing off with a good coat of primer (we used a stain-blocking primer since there was some previous water damage to the ceiling in one corner) and two coats of bright white ceiling paint.

All in all, I’m so glad we chose to do this, but it’s one project I wouldn’t have minded hiring out. It took us (me) a solid week to get the ceiling mudded three times and sanded down to what I considered “good enough” (there are plenty of imperfections and I know exactly where they each are). I walk walking like an old lady for the duration of the project and probably a while after.
The good news, though, is we now know exactly what we’re doing when it comes to ceiling texture removal. The even better news is that there are no other rooms in my house nearly as large as my living room, so the worst of it is out of the way.
Over to you- talk to me about your ceilings! Are they textured, smooth, planked, tiled, or something else? Have you ever wanted to change them?