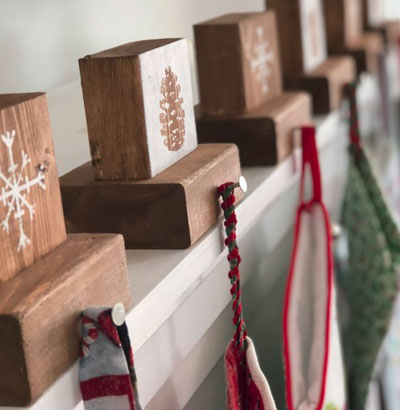
Hey there! Now that our fireplace is finally complete (with the exception of filling some nail holes), I am finally getting to settle into Christmas… only about 3 weeks too late for my liking. This is the first year I’ve ever had a mantle to hang stockings from, and I couldn’t be more excited about it! However, that meant I needed to come up with a cute way to display our stockings. I’ve struggled from year to year trying to figure out where to put them, but now that we’ve got our fireplace built, they’ll have a permanent home from year to year.
I love these stockings, and there is so much sentiment behind each of them. A beloved relative of mine makes a stocking for each of the babies as they are born, and they receive them for their first Christmas. I’ve always loved the design she chose for mine. In the years that passed, I looked forward to receiving one for each of my babies as they came. She made Nate’s for him a few years back, and even though it doesn’t have quite the same pattern, it was really meaningful to receive. As for Dexter’s, I almost didn’t put his out this year. I’m pretty sure he’s landed himself on Santa’s naughty list for a few shenanigans he’s pulled recently, but I felt bad not even giving the poor pup a chance to make it up over the next two weeks. Who knows, maybe he’ll get it together and be an angel for the next 11 days. It would be a Christmas miracle!
Anyway, this is a quick craft, so I’m going to try to keep this post pretty short. If you’ve got a free afternoon, a little bit of paint or stain, a chunk of 2 x 4 (it doesn’t even have to be a full board!), and a few nails, you’re all set!

DIY Rustic Stocking Hangers
Cut your pieces
When I’m building something I generally like to use even measurements to make the math work easier for me (I’m not a numbers person). For these, I just eyeballed the size I wanted for the base and the top, and cut one of each. When I stacked them together and was confident that I liked the way they looked together, I used those pieces to trace out the rest. I cut them with Dewey, my DeWalt miter saw and gave them a quick sanding.

Stain or paint your pieces
I stained my pieces with this phenomenal Minwax Waterbased Wood Stain (I used Colonial Pine). If you’ve ever done a paint party with me, you know I’m obsessed with this stuff for small projects that I want to move quickly with. It has no nasty, fumey smell and your pieces are almost completely dry once you wipe the stain off. This stuff was a gamechanger for me with paint parties, because it allowed us to stain our signs the night of the party, rather than me having to stain ahead of time with an oil based stain.
Cut your stencils
If you’ve got a Cricut or Silhouette, go ahead and cut your designs. I designed these snowflakes and pinecones on my iPad in Procreate, with my Apple Pencil. The capabilities of that program is amazing to me! It’s what I use for nearly all of my hand lettering projects, or any time I know I’ll want a piece of art digitized. (Psst- subscribe to the blog and receive these two svg files for free!). Otherwise, you can hand paint your designs, or add scrapbook paper, or paint with chalkboard paint to write on later.

Paint
Apply your stencils and paint. I always remove my stencil (carefully!) before my paint dries- I let it sit for 10ish minutes.

Attach to the base
I attached my painted pieces to my base using 2 2.5″ brad nails. Again, I sort of eyeballed it as I centered the top piece.
The final nail…
I added a roofing nail (because we happened to have them sitting around in the basement) to hang the stockings. You could use a cute knob or hook if you wanted- I just liked the simple look of the nail.


