
Christmas has officially hit at The Someday Home, although it was delayed by our living room project this year (read about that here and here and here). I realize I owe you all an update on the living room, and I promise it’s coming! We’re almost finished, and I can’t wait to share it with you. When we tore our living room apart in September, I honestly didn’t imagine it would still be unfinished now… but, it wouldn’t be The Someday Home if we moved quickly with our projects, I suppose. You can sneak a few peeks in these Christmas tree photos, though, of some of the progress we’ve made (cough, cough… check out those floors! They’ve been down for about 5 days now and they still give me all the #hearteyes)
Anyway, I wanted to share with you today a few quick tips for decorating a fake Christmas tree- more specifically, how to make a fake Christmas tree look a little less fake
This is the 5th year I’ve decorated this tree- I know that because we got it from my mom the first year we moved into The Someday Home. It’s 7’ of pure beauty with its little pine cones and frosted branches (which honestly, aren’t my favorite just because I think it kind of limits the color palate I can use to decorate with) and on the skinny side, which makes it a little less imposing in a tight living room. (Side note: before we added the stairs to our living room in April, this room felt MASSIVE and having a big, fat Christmas tree wouldn’t have been an issue, but now I am so glad ours isn’t any wider than it is!).

It takes me a good 3 hours to really decorate this tree well. Part of the reason I take my time is that it is a kind of intense process, but also I just really enjoy it. It usually happens on a weekend, so I usually decorate to the ambiance of a football game going on in the background and children running throughout the room, asking how they can help. I wouldn’t have it any other way!
This is my process, broken down step by step.
Fluff the branches

I know, it’s nobody’s favorite part, and the larger your tree, the longer it’ll take. This part takes me a good 45 minutes to an hour, just depending upon how wonky the branches ended up being after spending 10ish months (okay, 9ish if I’m being honest) in a box. I like to start at the top and work my way down, pulling the branches out straight and turning the ends up slightly. The bottom of my tree is a little more sparse than the top, so I spend a lot more time down there. I reach all the way in toward the middle of the tree and pull the branches straight out to the side, some upwards, and some down. Step back often to examine your work and see if you can see the middle of your tree.
Lights

This is probably my second least favorite part, but it’s really where the magic happens. Seriously, second to fluffing the branches, this is the most important step. I like to add a lot of lights to my tree, and I like to make sure they’re distributed evenly, paying special attention to the inner part of the tree. That’s right, we’re not taking the string and just wrapping it around the tree. Again, I start at the top of my tree and weave my lights around the branches, making sure to work them in toward the center bar. I once read somewhere that you should have 100 lights per foot of height on your tree, and I come in a little over that at 8-9 strings of light on mine (just depending upon how frustrated I get halfway through stringing lights). It’s a pain in the butt, but the magical glow this tree puts off in the evenings is so worth it.
Garland or ribbon

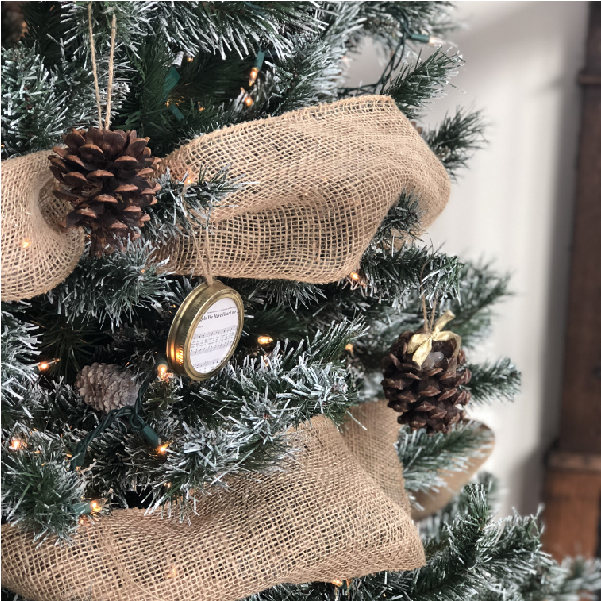
If you have a sparse tree, this is your lifesaver! I don’t get into glittery garland, but I do love a good, wide ribbon. All the better if it’s wired. I’ve been using this burlap ribbon for 5 years and it’s held up well for the most part. Rather than wrapping it around the tree tightly, I like to make it look kind of bouncy and draped.


I do that by tucking the end into the top of the tree, pulling out a length (about 12” at the top of the tree, closer to 24” as I work down to the bottom of the tree), twisting the ribbon, and then stuffing the twisted part in toward the middle of the tree. I then pull out another 12ish inches, twist, stuff, and repeat. I could use twist ties to tie them into the tree, but I know that would make me insane when it came time to take the tree down, so this method works well for me. Like with my ornaments, I spend quite a bit of time rearranging the ribbon throughout the season. This tree takes about 4 rolls of ribbon. When I reach the end of a roll, I tuck the end of the ribbon into the tree and start from the same spot with my new roll.
Ornaments

Ornaments come next! If you’re anything like me, you put them on your tree and then spend the duration of your holiday season rearranging them. I try to get them evenly distributed by putting them on in kind of a zigzag pattern, working from the top all the way to the bottom on one side, and then the next side. I put my mason jar lid ornaments on first and then fill in with my pine cones since I have a lot more of them.
I made the pine cone and mason jar lid/Christmas ornaments when we got the tree. I keep telling myself that maybe next year I’ll switch up my theme, but each year I keep putting it up because I still think it’s so dang pretty.
The tree skirt is another homemade item, and probably the last time I spent too much time with my hot glue gun (it’s a wonder I still have fingerprints on my right hand). It’s starting to look a little raggedy, so I’m thinking I’ll try to score a thrifty new tree skirt at the end of the season.

What do you think? Do you have a fake tree? How do you decorate it? I would love to hear from you!
(psst… did you know you can subscribe to the blog, so you never miss a post? I promise I’ll never send you anything spammy, only updates to let you know when something new is going on here at the blog!)

One Response
SO PRETTY! I’ll get my tree to look like that one day! But for now, elsa and anna will do! I LOVE the simplicity of the pinecone ornaments!