
It’s been a while! What was supposed to be our medium-sized living room renovation got real ugly, real quick. I haven’t posted much as far as updates go unless you follow me on facebook or instagram, mostly because I’ve either been working on our living room, working my real job, keeping my kids alive, or too exhausted to do any of the above. Also, the renovation process isn’t pretty, so it doesn’t really inspire a person to share too much about it. I think I needed a little distance from it before I was ready to talk about it, which I received last week during our trip to Nashville.
But with that being said, we’re still living in some ugliness, but I think things are finally starting to come together. We have a few minor finishing touches to put on it, along with at least 2 major projects until we can officially call it “done.” I want to share the process with you step by step, so I suppose it’s best to start at the beginning. It’s the favorite part of any project for anyone who isn’t in charge of cleaning up the mess (or at least its the favorite part for each of my guys)… Demo Day!
Demo Day(s)
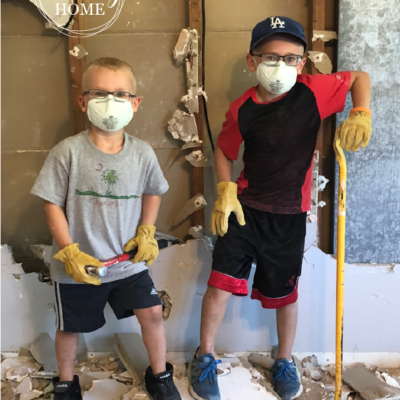
When it comes to Demo Day, my husband and I are pretty much just like our BFFs Chip and Joanna. His excitement for the impending project combined with the utter delight he apparently feels whenever he grips a sledgehammer is enough to fuel him and the boys until the project (victim, perhaps is more appropriate) is fully underway. I, on the other hand, tend to stand back and nervously watch the destruction, reminding the boys to keep their safety gear on and wondering who in the hell thought this was a good idea to begin with.

This time around, Demo Day actually stretched out over the course of 2 days. Our living room isn’t enormous, but it is a decently-sized space. We took the time to tape off our newly erected banister to prevent any damage, as well as taping off all entrances and exits, with the exception of our stairwell.


I know I’ve complained about mentioned it here before (and to all of my family and friends, and in passing to random strangers, and probably in my dreams and nightmares also), but the walls in this house are double-layered with some type of a plasterboard or cement board. I’m not sure exactly what it is, but I do know I don’t want my grandma to read what I actually call it… so suffice it to say, I’m not a fan. It’s heavy, thick, and nearly impossible to match with new drywall (hence “The Lump”).

Once the boys got it all off of the walls, it took us quite a while to get it all out of the living room and into the bed of the truck to be hauled off. With the drywall removed, you can see where there used to be a door to our hallway- we removed it when we re-did the layout of our house a few years back and moved our dining room to our old “grandma” room. You’ll also notice the disgustingly overly-textured and uneven ceiling… as soon as we removed the drywall, we knew it was also the right time to tackle that beast, too.

I’ll share more about the ceiling work next week, but trust me when I say it wasn’t as much fun as it sounds.
I cringe a little bit when I look at these pictures, but all in all (now that I’m almost at the end!), I can say I’m glad we did it, and we’re that much closer to having ONE room in this house that we can call completely finished.