FREE Plans for Simple DIY Herringbone Table Top

DIY Herringbone Table Top

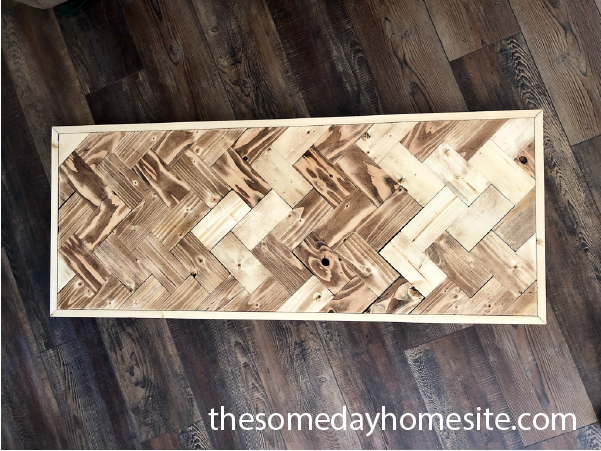
Ooooh man. This post has been a long time coming. I’ve been dreaming about a herringbone coffee table for my living room for a while but hadn’t quite figured out how I was going to do it. One week, Nate was out of town for a conference, so I decided to scour the garage and just go for it… and boy oh boy, I’m in love with this herringbone table top!

The best part of this herringbone table top is that it’s made almost entirely out of pine 2 x 4’s (ie: it’s super affordable). With the exception of a few pieces of scrap 1 x 4’s, this table top was built entirely out of cheap construction-grade studs. Now, I know pine isn’t exactly the finest choice for furniture building, but I’m a firm believer that #pineisfine, especially for my unfussy decor aesthetic. Also, I pretty much know my kids are gonna destroy just about anything I put in my home anyway, so for right now, the cheaper the better. Now that I’ve got one of these bad boys under my belt, I can always build another one out of a hardwood.

So, do you want to know how I did it? Grab a beer, because we’re gonna get into it.

DIY Herringbone Table Top

Supplies:

  • Scrap 2 x 4’s (I wasn’t sure how big I was going to make my table top or even if my plan was going to work, so I used what I had and just cut a bunch of scrap wood up. I ended up with so many leftovers- which is fine because I plan to build two end tables the same way. For reference, I cut around 89 pieces at 6″ each and ended up with plenty of leftovers, which is fine since I plan to build matching end tables. For reference, this would be approx SIX 8′ 2 x 4 boards. Like I said, I used scraps rather than full boards, but I realize not everyone has the abundant scrap pile we do. #blessed #abundance #wegotwood ????)
  • Elmer’s stainable wood glue
  • Scrap 1 x 4’s (Again, this was scrap wood, dug out of our massively embarrassing garage pile. If I were to do this without scrap wood, I would purchase 2 8′ 1 x 4’s.)
  • Wax paper
  • 1.5″ brad nails

Tools:

  • Planer (optional, but highly recommended. Construction lumber is known for being rough, twisted, and not always perfectly straight. A quick planing session before getting started can help ensure you’re working with smooth surfaces, free of any cupping.)
  • 6-pack of Bud Light for your neighbor who lent you his planer (you can skip this one if you have your own planer, or keep it on the list and drink it yourself. After hours, of course.)
  • Table saw
  • Miter saw
  • ALL OF THE CLAMPS
  • Brad nailer

Building a DIY Herringbone Table Top

Before I cut any of my pieces, I ripped each 2 x 4 down on the table saw to give me a nice, perpendicular surface to adhere the pieces to. I took off approx 1/8-1/4″ from each side, effectively removing the rounding on each side. The goal is to get each 2 x 4 to exactly 3″ wide. Remember to measure EVERY time before you cut, and also remember that a 2 x 4 IS NOT actually 2″ by 4″.
I set the measurement at 3″ to take off the other rounded edge, then I set my saw to 3.25 to take off the first side of the board.

table saw measurement. diy herringbone table top rip downtable saw measurement. diy herringbone table top

*For a quick reference on lumber dimensions, check out the handy chart I made with actual lumber dimensions.

Once I had all of my 2 x 4’s ripped down to 3″ wide, I ran each one through the planer on each side to make sure that every board was exactly the same width and to make sure I had a nice smooth top.

After I was done with that, I cut each board down to 6″ lengths on my miter saw. This took a long time and in hindsight, I wish I had set up a stop block to cut down on time spent measuring AND to ensure exact and complete accuracy with each cut. If I had a crosscut sled, I would have done these cuts on my table saw also, again, to ensure accuracy.

Once you’ve cut your billionth 6″ piece, take a little sandpaper to each block to remove any splinters from cutting. Cheap pine is notorious for making messy cuts, and honestly, the state of my miter saw blade probably didn’t help matters much. Luckily, I had two willing helpers for this step. I paid them each a nickel per block, so I’d say it worked out in my favor.

Now, you’re ready for the fun part!

Gluing up the Herringbone Pattern for the Table Top

pine blocks in herringbone pattern


I wasn’t sure how to make this next part happen- I googled “herringbone glue-ups,” “herringbone table top glue-ups,” and various forms of the same thing many times with no luck. It didn’t look like anyone had any advice for me on gluing up a herringbone pattern, so I had to figure it out on my own.

*there are plenty of methods online that will have you use a piece of plywood as a base and then either glue or nail your blocks to it in a herringbone pattern. I wanted to try gluing it up because I thought it might make for a better outcome.

I started by laying out my wax paper to keep the glue from dripping out of the boards and sticking to the table. It was easiest to glue up two pieces at a time, clamp them, and allow them to set for 30 min before moving on. I have a limited number of clamps (and I couldn’t find two of them at the time!), so this part took a LONG time. I squared the sets up with my metal square, and clamped them to a couple of boards I screwed to my table to create a 90 degree jig.

two blocks of pine wood with a metal square

Once I had glued up 13 sets of two blocks, I decided I was happy with the length. I glued the 13 sets together, two sets (4 blocks) at a time. To get a solid bond with the glue, I used 4 strategically placed clamps.

Again, I waited 30 minutes before adding more glued up blocks.

Once I had the whole length glued up, I started gluing up more sets of two blocks so I could repeat the process again to add to the width of the table.

I considered gluing up the pairs into another length of 13 sets, but I wasn’t entirely sure that it would line up perfectly. Instead, I added the pieces two sets at a time (4 blocks at a time). I kept going in this pattern until I was happy with the length and the width.

pine blocks in herringbone pattern with three clamps


Trim the sides

diy herringbone table top being cut down with circular saw


I used my circular saw to trim the jagged sides. I clamped my guide to create a guide to slide the metal guide of the circular saw along. Next, I used my metal square to make sure the sides were exactly square before cutting my short sides.

diy herringbone table before side trim


I set my table saw width to match the depth of the table top (approx. 1 3/8″, as I had taken some off of the surface in the planer). Once I had my fence secured, I ripped down my 1 x 4’s so I could use them to line the sides of the table. I liked the framed look, and I felt like this hid some of the raggedness on the ends. I mitered the corners and tacked them on with the brad nailer.

diy herringbone table top pre stain


Finishing touches

I sanded the table top with 80 grit sandpaper to remove the areas where glue had squeezed out. Although I tried my best to line everything up, there was a little movement when I tightened the clamps, so I did have a few edges to sand down.

Next, I used a variation of my two-step stain process. I started off with Minwax Dark Walnut. After letting it dry completely (about a day), I hit it with 120 grit sandpaper. The goal wasn’t to take ALL of the stain off, but for the look I wanted for this project, I wanted to get most of it off. I wanted the dark stain to highlight the lines, knots, and any imperfections in the grain.


Next, I applied a coat of Minwax Early American. I like the lighter color of the stain, but the dark highlights from the Dark Walnut still peek through.


Normally, I would stop there, but I still wanted it to be a little lighter. I sanded it with 320 grit paper and ended up taking most of it off.

I finished it with 2 coats of my favorite wipe on poly, Minwax Wipe-On Poly in Clear Satin, sanding lightly between coats.


What I wish I had done differently…

Somewhere along the line, I must’ve cut a couple of pieces just a little too long. I didn’t realize this until I tried to glue all of it up, and by that time it was too late. I could’ve prevented this by using a stop block on my miter saw to create accurate cuts, or by using a cross sled on my table saw.

All mistakes aside, I’m still really happy with how it turned out.

Do you love herringbone? I would love to hear if you plan to make a herringbone table top, too!

DIY Farmhouse Window Trim


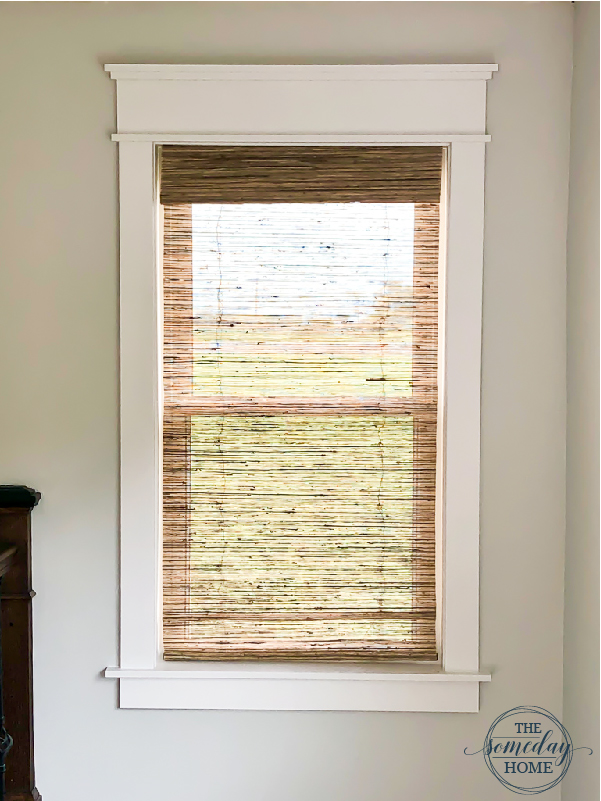
Sometimes the simplest projects have the biggest impact- and that’s exactly the case with this project. Our super simple DIY farmhouse window trim completely elevated the look of the entire room. In fact, outside of my DIY fireplace and my new rug, our window trim is something that inevitably gets mentioned when people are in our home (and no, I’m not always the one who brings it up… although, admittedly, I am a little bit obsessed). If you’re looking for a simple, affordable way to add some character to your home, this DIY farmhouse window trim project is for you!
In its original state, our living room was sporting the dreaded orange-y maple trim around the windows and the floors. I could have painted it white and called it a day, but I had my heart set on something with a little more character.

empty living room, showing a before image of windows

Also, when we had our windows replaced, we also ended up replacing all of the drywall on those walls. I couldn’t see myself re-installing orange trim that I didn’t love over our brand new drywall, so our living room sat without any window trim at all for a while.

This was one of those projects I put off doing for a while because I thought it was going to be hard to figure out in terms of materials, cuts, and measurements. That couldn’t have been farther from the truth! If you’re on the fence about giving this project a try, don’t wait on it like I did :).

DIY Farmhouse Window Trim

Materials:

1 x 6 Primed MDF board

1 x 4 Primed MDF board

1 x 2 Primed MDF board

2” brad nails

Paintable caulk (if you’re painting your trim- if your trim will be stained, I would recommend using a clear caulk)

White wood filler

Tools:

Table Saw

Miter Saw

Brad Nailer

We installed all of this with 2” brad nails, with the exception of the head jambs, where we opted to use screws.

Window Jambs and Stools

Before we could start on the trim, we had to do our jambs and stools. This next picture isn’t a pretty one, but it is the best one I have to illustrate jambs and stools.

diy farmhouse window trim window with out trim, showcasing side jambs and head jamb and stool

If you’re just replacing your window trim, you might not have to do this part. However, if your window stool isn’t as bulky as you want it to be, you may have to replace it. I wanted ours to extend out past our trim by about an inch (give or take), so we knew our stool needed to be wider than our head and side jambs.

We used 1 x 4 select pine boards to line the interior part of the window (the side jambs and the head jamb). To make our stool, we used a 1 x 6 with the ends notched out (to slide in between the side jambs).

Building Simple DIY Farmhouse Window Trim

For quick reference, here’s a picture with all of our boards labeled.


Side trim

Once we had our jambs and our stool in place, we were ready to build our trim. We started with our sides. We attached our 1 x 4 primed MDF boards to the sides, running them from the very top of the stool up the whole length of the window plus 1/8” for a slight jamb reveal. This part is important- and I never gave it much thought before. Pay attention the next time you look at professionally installed window or door trim- there is always a small area of the jamb that isn’t covered by the face trim. Why the 1/8” reveal? No board is perfect, and if you try to line up the side trim with the side jamb to make it completely flush, you’ll notice any curve or warp in the board, not to mention that even if it does flush up perfectly at the time of installation, changes in humidity or your house settling can cause even the most perfectly straight boards to warp and curve. A 1/8-3/8” reveal not only helps disguise those imperfections, it also elevates the overall look of your trim job.

diy farmhouse window trim, 1/8 inch reveal

I also want to mention here to measure EVERY side of your window before you cut. Just because the left side of your window trim needs to be cut to 56 3/16” does NOT mean your right side will also. Differences in how your stool and top jamb are sitting can mean different lengths on each side. For all of my perfectionists out there (… sheepishly raises own hand…), this might drive you a little batty, but just know that your walls are probably not perfectly… perfect. Tailoring each piece of trim to the actual size of your window will ensure that everything fits together well and looks perfect. Even if your walls aren’t. (It’ll be a dirty little secret between you and your walls… I promise, I won’t tell anyone).

Apron

Under the stool, we ran a 1 x 4 to span the width of the window + the side trim. Although they’re separated by the stool, we wanted the ends of the apron to line up as perfectly with the sides of the trim as we possibly could.

Head Trim


This bulky top trim makes my heart so. happy. I love it, but I do have to admit that it was the most obnoxious part of the process. I specifically wanted my 1 x 2s to have a subtle difference in width from my side trim, so using the 1 x 2 in its original form wasn’t going to work- it was going to stick out too far. We fired up the table saw and shaved off 1/4” to make them 1 ¼ wide (because, y’know… if it’s not confusing enough already, we should mention that when a board says it’s 1 x 2, that actually means it’s ¾ x 1 ½). This meant that it was going to protrude from my side trim by 1/2” which was the perfect subtle difference I was looking for.

To keep things consistent, we also opted to bring the 1 x 2s (which- remember- were no longer 1 x 2’s, or more appropriately, ¾ x 1 ½s, they were now ¾ x 1 1/4s) ½” past our side trim on each side.

On top of our ripped-down 1 x 2s (¾ x 1 ¼s), we put our 1 x 6 board. We spanned the width of the window plus the two side trim pieces, to keep it clean. Then we added another ripped-down 1 x 2, cut to the same length as the bottom one (width of the window + two side trim pieces + 1” {remember, we did the ½” extra for each side}).

We needed one more piece for the top, and I wanted to stay consistent with my 1/2” extra protrusion all around, which meant I needed a board to be 1 ¾” wide… of course, ¼” too wide to be a regular 1 x 2. We ended up ripping down a 1 x 4 to the appropriate width (1 ¾” wide), and again, extended it ½” past the top piece it was sitting on. This allowed our very top trim to line up perfectly with our stool- something that makes my husband’s OCD brain very happy.

Finishing

Once all of the pieces were installed, I caulked all of the joints and any gaps we had between the walls and the trim, or the jambs and the windows. I also used wood filler to hide the nail holes from the brad nailer.

A quick note

One thing I did that I totally regretted was painting my trim pieces before we installed them. I thought it would be easier to paint them on the floor rather than having to paint them when they were up on the wall (having to tape, pull out the ladder, etc.). After caulking and filling nail holes, I had to touch up the paint anyway. Painting before installing was an extra step that was unnecessary.

I’m still working on eradicating the orange wood from our home, but I’m proud to say that there is no more orange in my living room! I can’t wait to share it with you when it’s finished!

Actual Lumber Dimensions:


Actual Lumber Dimensions:

a beginning DIYer’s handy guide to understanding the actual size of boards

Nothing ruins a set of DIY plans more quickly than not accounting for the actual size of the boards you’re using. Go ahead and laugh at me, but when I was first beginning to build things, I thought a 2 x 4 was actually 2” by 4.” If you’re new to building things, this may be news to you, but the nominal lumber dimensions (the name by which they’re sold and commonly called, ex- 2 x 4, 1 x 4, etc.) is not the same as the actual lumber dimensions.

If you’re a simple soul like me, you’re probably asking why the hell anyone would play such a mean prank on the world. Isn’t calling a board a 2 x 4 when its actually not that size like calling a cauliflower-crusted, marinara and cheese-topped oven disaster a pizza? (Side note: we all know that’s not really a pizza and anyone who tries to invite me over for “pizza” and then proceeds to serve me that cauliflower-cheese-Frankenstein mess will never be a real friend of mine.) So why do they do it?

Historically, when boards were cut and milled to be used for lumber, they were cut at 2” by 4.” By the time they underwent the drying and planing process, they came out to be 1 ½ by 3 ½.” Today’s harvesting and milling processes have changed, but the lumber dimensions still come out to those old standard sizes we’ve all become accustomed to.

It’s a lot to keep track of, so I made this handy lumber chart to help me keep track of my sizes. I refer to this chart when I’m sketching out plans for projects, and hopefully, it’ll help you too.

Actual Lumber Dimensions Chart

Nominal size

Actual size

1 x 2 ¾ x 1½”
1 x 3 ¾ x 2½”
1 x 4 ¾ x 3½”
1 x 6 ¾ x 5½”
1 x 8 ¾ x 7¼”
1 x 10 ¾ x 9¼”
1 x 12 ¾ x 11¼”
2 x 2 1½” x 1½”
2 x 3 1½” x 2½”
2 x 4 1½” x 3½”
2 x 6 1½” x 5½”
2 x 8 1½” x 7¼”
2 x 10 1½” x 9¼”
2 x 12 1½” x 11¼”
4 x 4 3½” x 3½”
4 x 6 3½” x 5½”
4 x 8 3½ x 7¼”
6 x 6 5½ x 5½”
8 x 8 7¼ x 7¼”

Now, mathematics is not my spiritual gifting. You want help picking out a rug or putting together a mean peanut and butter sandwich? I’m your gal (the secret is to add pretzels and banana slices. You’re welcome). You need help with long division? Hard pass. I like to keep this table handy when I’m in the planning stages for my projects so I can make sure I’m calculating everything correctly (on my calculator, of course, not in my head like some genius).

I hope this helps!

How to Choose the Right Grout: Grout 101

When we decided to tackle our basement bathroom, grout was truly an afterthought. We’re tile newbies. We didn’t know what to expect- this bathroom was our very first tiling project. I mean, how many different considerations does a person need to make about tile grout? Much to my surprise, we had a lot to learn, and in true Someday Home fashion, we put ourselves on a stressful timeline to learn it. I’m talking “2-year-old without a nap staring at tile and grout samples in the late afternoon” stressful.

Don’t make the same mistake we made. If you’re getting ready for your first tile project, take a minute to give grout the respect it deserves. I realize that sounds dramatic, but the decisions you make regarding your grout can impact everything from the maintenance and longevity of your tiling job to the overall look and feel of the room in which it resides. There’s too much riding on that decision to merely toss any random bag of dry mix into your cart without doing your homework (which is basically what we did). Convinced? Great. Let’s get started.

Grout 101

Types of Grout

Did you know there are different types of grout? Maybe you did… I’m not sure I ever gave it much thought. Much like anything else in the construction and renovation world, there are a few different options for grouting your tile, and each type is best suited for different applications.

Sanded Grout

Sanded grout is a cement-like mixture with sand added to it to make it resistant to shrinking and cracking. This type of grout is recommended when your grout lines will be larger than 1/8” wide. This is the type of grout we used.

TEC power grout, how to choose the right grout

Unsanded Grout

Unsanded grout is a smoother grout, and you guessed it, does not have sand added to it. It’s stickier, making it a good option for tiling walls. Because it doesn’t have the sand in it to prevent shrinkage, it’s not suitable for wider grout lines. Unsanded grout is recommended for grout lines 1/8″ or less.

Epoxy

Epoxy grout is made from epoxy resins and is waterproof, and often used in areas susceptible to staining, such as kitchen backsplashes, tiled countertops, and bathrooms. Although it is durable, some homeowners opt against it because it doesn’t have the same character as sanded and unsanded grout. It can look sort of plastic-y. Also, it does come with a higher price tag, and is more difficult to install. If you’re new to the tiling game and your heart is set on epoxy, it’s probably worth the price tag to hire a professional to do the install here.

Sealing vs Self-sealing

I’ll probably have the tiling and grout community up in arms over this one because to be honest, I’m on the fence about it too. Some grouts require sealing after they’ve fully cured, and others do not. From what I can understand, porous grouts require sealing to avoid staining and ease the cleaning process. Imagine spilling red wine on unsealed concrete- if you allow it to dry, it’ll leave a stain (not speaking from experience or anything…). It makes sense that your porous grout would be the same way, right? Because epoxy grout is nonporous, it does not require sealing.

Now apparently, not everyone is on the same side of this argument… for example, Mike Holmes from Holmes on Homes recommends that you don’t seal your grout (he does mention that it is important to seal your tiles, though, if you’re using a natural stone). According to Holmes, leaving your grout unsealed is important for proper ventilation of your tile. If moisture gets behind your tile (and if it’s in the bathroom or kitchen, it likely will), it needs to be able to evaporate. If you seal your grout, the moisture won’t be able to escape… and as everyone whose ever watched one of those DIY renovation shows on HGTV knows, trapped moisture is always a precursor to disaster.

Grout colors

As a self-proclaimed design junkie, I’m embarrassed to admit that I had no idea just how many grout colors were available! If you’re staring down the planning stages of a tiling project, make sure to get really clear on the overall look you want for your completed project. Although your grout lines account for a small overall area of your project, the right color can make or break your final look.

Contrasting

Are you a puzzle master who has laid out an intricate pattern with your tile? Highlight those Tetris-skills with a grout color that contrasts your tile color! If you want your tile pattern to really stand out, or you want to bring more texture to your room, contrasting grout is the way to go. The dark charcoal-colored grout brings a striking contrast to the white tiles. Paired with the high-texture of the brick wall above it, this wall is full of character.

white tile with contrasting grout

Complementing

Choosing a complementing grout color can unify the overall look of your design and make your space appear bigger. If you’re using a multi-colored tile like a marble-look or something with a pattern, I would suggest pulling the main color from the tile to match your grout. If your tiles have a busy pattern, matching your grout can be a good way to add an element of calm to help ground what could otherwise be a chaotic look. This is a good option if you want your tile to be the star of the show, as the grout lines won’t pull too much attention away from your tile.

tile with complimenting grout colors

When in doubt, hop on Pinterest and start making note of which overall tile looks you’re most drawn to.

DIY Photo Transfer onto Wood

Before we finished our living room, the item in my home that always got the most comments was my windmill, but coming in at a close second was the over-sized family portrait I transferred onto wood. Everyone who set foot in my living room commented on it, and it was definitely one of my favorite things. I mean, what’s not to love? It’s wood, it’s weathered, and it’s got some pretty good looking people on it (but I might be biased there).

diy wood transfer photo of family with two little boys


I took it down during our renovation, and I never put it back up because it really needed to be updated. My laugh lines are deeper, the boys are way taller, and if you look *really* closely, you’ll notice that we’re missing a kid. That being said, I’m gonna level with you: I was not itching to do it again, and I probably wouldn’t have, if it weren’t missing sweet Georgia Ann. This project was relatively affordable and easy to complete, but the time I spent trying to center the large portrait and ensure it was straight was… well, my personal version of hell.

I will say, though, that the end product is definitely worth the frustrating process, and if you aren’t trying to tackle a picture as large as mine, it probably won’t be so bad.

But, if you need any further motivation, I mean, just look at it!

Before I get into the details of the project, I want to give a shoutout to my amazing family photographer, Crystal Kruse of Kruse PhotoGraphics. She’s been photographing my family for 6 years now, and we are always blown away by her results. If you’re ever in the Sioux Falls area and you need a photographer, she’s your girl!

This project takes about 24-48 hours and $12-50 (depending upon what you’ve got for scrap wood, the size of your photograph, and how much your printer charges). Are you ready?

You’ll need:

  • Wood- get creative here! I used a piece of plywood, but you could use whatever you’ve got lying around. 1 x 4’s planked together, a 1 x 12 cut down to size… whatever fits your space! Feel free to paint or stain your wood, if you like, but keep in mind that a darker color might not allow your photograph to show up well.
  • A photo transferring fluid- I’ve used a couple of different ones. The first time I did this, I used Liquitex Gel Medium. This most recent time, I used ModPodge Transfer Medium. I was told that the ModPodge Transfer medium would let more wood grain show through, but honestly, I wasn’t happy with my experience this time… I’ll get into that in a minute. I definitely had an easier time with the Liquitex.
  • Your photograph, printed on paper with a laser printer

Step 1: Reverse your picture

Unless you want your picture to end up backward on your wood, you’ll want to reverse it. This is easily done in Photoshop or just about any free photo editing software.

Step 2: Print your picture

You can either have your photo printed at a print shop or in your own home if you have a laser printer. Because of the size of mine (24 x 36″), I opted to have it printed at my local print shop. I’ve heard you can use places like Staples and Office Max and ask for an “engineering” print, but I can’t speak to the quality since I’ve never done it that way.

Step 3: Spread the transfer fluid

Spread your transfer fluid onto your wood, coating it evenly. This was the beginning of the mini OCD attack for me…

The first time I did this project, I used the Liquitex Gel Medium. It went on pretty evenly, and my biggest concern was covering the entire area quickly enough so that none of it dried before my next step.

The ModPodge was much thicker and more difficult to spread. I had trouble getting all of my board covered, and then when I got to my next step, I had some real trouble getting my image flat.

diy photo transfer, plywood board, modpodge liquid


Step 4: Place your image

Place your image face-down on your board, making sure it’s aligned correctly. By this time, I was pretty much in full-blown anxiety mode, but luckily I had a set of helpful hands from my crafty 7-year-old to make this part a little easier. This step would be much easier and less panic-inducing if you’re doing a smaller-scale project.

Step 5: Let it dry overnight

Aside from the eagerness and anticipation of wanting to see the final results, this part is probably the easiest. Turn on Netflix, pour yourself a glass of wine, and chill out.

Step 6: Wet and peel

After 24 hours has passed (or more, if you get really busy and forget about your projects like I do sometimes), you can begin to carefully peel the paper off. This works best if you use a spray bottle to get the paper wet and then use a towel to gently rub the back part of the paper off, being careful not to rub too hard. You just want to remove the top layer of the paper. If you scrub too hard, you’ll risk removing your image.

This process can be kind of a tedious one, but don’t lose heart! You’re almost done!

diy photo transfer, peeling paper off of a wooden board


Step 7: Seal and finish

Once you’ve got your paper removed, you are ready to finish it. I finished our first photo board with a coat of Liquitex and then a light once-over with a medium-dark stain to add some warmth and rustic-goodness. The second time around, I lightly brushed on a coat of vegetable oil, and then applied another coat of ModPodge to seal it.

Final results

I definitely preferred the Liquitex that I used the first time around. Because my ModPodge was thicker in some areas, I had some problems with my paper rippling and not laying totally flat, which resulted in a strange, tiger stripe-y pattern. I really loved the wood grain coming through in the sky area of the background, but I just wasn’t pleased with the overall results.

diy photo transfer, family photo on a wooden board


Luckily, Smallwoods was running a killer sale, so I had no qualms with tossing my failed project in the scrap wood bin and instead having a beautiful, wood framed sign board printed and sent to me. Their prices were incredible and I couldn’t be happier with the quality!

diy photo transfer 3, framed family photo sitting on a wooden box with a bouquet and clock next to it.


How to Decorate a Fake Christmas Tree

Christmas has officially hit at The Someday Home, although it was delayed by our living room project this year (read about that here and here and here). I realize I owe you all an update on the living room, and I promise it’s coming! We’re almost finished, and I can’t wait to share it with you. When we tore our living room apart in September, I honestly didn’t imagine it would still be unfinished now… but, it wouldn’t be The Someday Home if we moved quickly with our projects, I suppose. You can sneak a few peeks in these Christmas tree photos, though, of some of the progress we’ve made (cough, cough… check out those floors! They’ve been down for about 5 days now and they still give me all the #hearteyes)

Anyway, I wanted to share with you today a few quick tips for decorating a fake Christmas tree- more specifically, how to make a fake Christmas tree look a little less fake

This is the 5th year I’ve decorated this tree- I know that because we got it from my mom the first year we moved into The Someday Home. It’s 7’ of pure beauty with its little pine cones and frosted branches (which honestly, aren’t my favorite just because I think it kind of limits the color palate I can use to decorate with) and on the skinny side, which makes it a little less imposing in a tight living room. (Side note: before we added the stairs to our living room in April, this room felt MASSIVE and having a big, fat Christmas tree wouldn’t have been an issue, but now I am so glad ours isn’t any wider than it is!).

tall christmas tree with burlap and lights


It takes me a good 3 hours to really decorate this tree well. Part of the reason I take my time is that it is a kind of intense process, but also I just really enjoy it. It usually happens on a weekend, so I usually decorate to the ambiance of a football game going on in the background and children running throughout the room, asking how they can help. I wouldn’t have it any other way!

This is my process, broken down step by step.

Fluff the branches

three kids fluffing christmas tree branches

I know, it’s nobody’s favorite part, and the larger your tree, the longer it’ll take. This part takes me a good 45 minutes to an hour, just depending upon how wonky the branches ended up being after spending 10ish months (okay, 9ish if I’m being honest) in a box. I like to start at the top and work my way down, pulling the branches out straight and turning the ends up slightly. The bottom of my tree is a little more sparse than the top, so I spend a lot more time down there. I reach all the way in toward the middle of the tree and pull the branches straight out to the side, some upwards, and some down. Step back often to examine your work and see if you can see the middle of your tree.

Lights

christmas tree with white lights


This is probably my second least favorite part, but it’s really where the magic happens. Seriously, second to fluffing the branches, this is the most important step. I like to add a lot of lights to my tree, and I like to make sure they’re distributed evenly, paying special attention to the inner part of the tree. That’s right, we’re not taking the string and just wrapping it around the tree. Again, I start at the top of my tree and weave my lights around the branches, making sure to work them in toward the center bar. I once read somewhere that you should have 100 lights per foot of height on your tree, and I come in a little over that at 8-9 strings of light on mine (just depending upon how frustrated I get halfway through stringing lights). It’s a pain in the butt, but the magical glow this tree puts off in the evenings is so worth it.

Garland or ribbon

christmas tree with burlap ribbon and lights


If you have a sparse tree, this is your lifesaver! I don’t get into glittery garland, but I do love a good, wide ribbon. All the better if it’s wired. I’ve been using this burlap ribbon for 5 years and it’s held up well for the most part. Rather than wrapping it around the tree tightly, I like to make it look kind of bouncy and draped.

hand ribbon christmas tree


I do that by tucking the end into the top of the tree, pulling out a length (about 12” at the top of the tree, closer to 24” as I work down to the bottom of the tree), twisting the ribbon, and then stuffing the twisted part in toward the middle of the tree. I then pull out another 12ish inches, twist, stuff, and repeat. I could use twist ties to tie them into the tree, but I know that would make me insane when it came time to take the tree down, so this method works well for me. Like with my ornaments, I spend quite a bit of time rearranging the ribbon throughout the season. This tree takes about 4 rolls of ribbon. When I reach the end of a roll, I tuck the end of the ribbon into the tree and start from the same spot with my new roll.

Ornaments

christmas tree close up with ornaments


Ornaments come next! If you’re anything like me, you put them on your tree and then spend the duration of your holiday season rearranging them. I try to get them evenly distributed by putting them on in kind of a zigzag pattern, working from the top all the way to the bottom on one side, and then the next side. I put my mason jar lid ornaments on first and then fill in with my pine cones since I have a lot more of them.

I made the pine cone and mason jar lid/Christmas ornaments when we got the tree. I keep telling myself that maybe next year I’ll switch up my theme, but each year I keep putting it up because I still think it’s so dang pretty.

The tree skirt is another homemade item, and probably the last time I spent too much time with my hot glue gun (it’s a wonder I still have fingerprints on my right hand). It’s starting to look a little raggedy, so I’m thinking I’ll try to score a thrifty new tree skirt at the end of the season.

Tall christmas tree with burlap, mason jar lid ornaments, and pinecones


What do you think? Do you have a fake tree? How do you decorate it? I would love to hear from you!

(psst… did you know you can subscribe to the blog, so you never miss a post? I promise I’ll never send you anything spammy, only updates to let you know when something new is going on here at the blog!)

How to Paint Buffalo Check

Buffalo check was BIG last year, and it’s still hot this holiday season. When I was teaching sign painting and selling wooden signs and crafts, buffalo check and plaid were two of the most requested patterns. I thought since we’re all getting into the holiday spirit, why not go ahead and share it with you here?

red and black buffalo check sign with the words comfort and joy written on it

Step 1: Paint your background color

The first step is to cover your surface with your background color. This will almost always be your lighter color. Allow this to completely before you move on.

red board with paint brush


Step 2: Use painter’s tape to create the first set of lines


Start putting down your painter’s tape, being careful to make sure the edges are totally sealed (There is literally nothing more frustrating in the world than paint bleeds. Except for wet pant legs, maybe. And soggy cereal. And textured walls/ceilings (hi Dad!)). If you want your lines to be evenly spaced (and if you’re doing plaid or buffalo check, you do), take a small length of painters tape and use it as a spacer between your lines.

Step 3: Paint your darker color


Here’s where the magic begins to happen! You obviously don’t want to have a solid black line, otherwise, you’ll end up with a piece that appears to be all black with floating red squares. The trick here is to paint your second color on sparingly, one line at a time.


Immediately after putting the paint down, take a damp paper towel (you don’t want it too wet, or it can cause your paint to bleed*) and rub it over the paint down the length of your line, to create subtle streaks that appear to be going the direction of your line. This step takes a little trial and error to get your plaid stripes all a consistent color, so don’t be afraid to play with it a little bit. Once you’re satisfied with the color, let it sit 5-10 minutes, and remove the painter’s tape (while the paint is slightly wet). Again, allow this to completely dry before you move on.


Step 4: Tape in the opposite direction


Using the same method you did before to evenly space your painter’s tape, create your next set of stripes that will run the opposite direction. Again, make sure your tape is sealed down really well!

Step 5: Paint

Once again, you’ll paint your darker color and use a damp paper towel to remove excess paint. As you go, you’ll notice the parts that overlap with the first set of painted stripes are slightly darker- this is perfect! This is exactly what we want to create the buffalo check pattern. Again, wait 5-10 minutes and remove your painter’s tape.

Step 6: Admire

She’s a beaut, Clark! *This is where I would love to share a picture of my finished sample for you, but remember how I said not to use too get the paper towel too wet, or the paint might bleed? Yeah, that totally happened. It went in my “to be sanded and repainted” pile, for a later date.

Go ahead and write your favorite Christmas saying on it, use it to hang Christmas cards, whatever your little heart desires. Just make sure you share them with us, so we can see your creativity!

How to Remove Stippled Ceiling Texture

Today, in installation 2 of our Living Room Makeover series (check out our Demo Day(s) post for installation 1), I want to talk with you about a very serious matter. If you’ve been here a while, you already know it’s near and dear to my heart: texture. Specifically, ceiling texture.

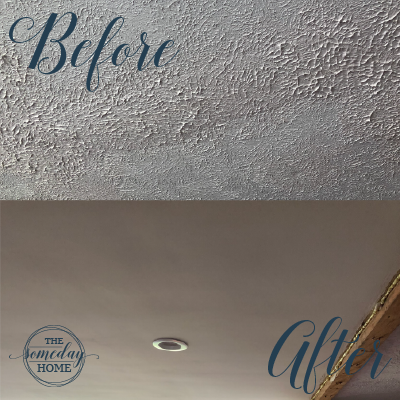
My dad and I can barely get through a family holiday together without an all-out feud over the merits of smooth vs textured walls, but textured ceilings? Forget about it. (For the record, I’m the one who is avidly anti-texture when it comes to my walls and ceilings). Now, if you’ll recall from my previous post, some of the ceilings in my house are heavily textured. And not well. I’m talking, uneven, thick, hideous texture. It looked a bit like an upside-down topographical map of a mountainous area, with some lower, easily-climbable mountains stretching across most of the surface, and then thicker, taller, death-trap mountains clustered together, in a way that was strangely linear, and correlating with the placement of our drywall seams… hmm…

stippled ceiling


When we moved our stairway to the living room, I knew I would eventually need to move the ceiling fan to center it over the actual living room space, rather than the space as a whole. I would also put a light above the stairway area. Nate had been wanting more light in the living room area, also, and so we considered adding some recessed lighting.

We knew that if we were ever going to get rid of the texture on our ceiling, now was the time. Our walls were already naked and the whole area was already a complete mess. Now, I will admit something here that I’m not proud of. I wanted to take the “easy” way out on this one. I had never de-textured (??) a ceiling before, but I was certain it wasn’t going to be a walk in the park. I had read numerous articles about installing planked wood sheets over the top of textured ceilings, and I really thought that was what I wanted to do.

planked ceiling with beautiful light

Perfect, right? Except… there was a catch, and we didn’t realize it until we cut the hole in for the new ceiling fan. The ceiling, much like all of the walls in this house, was triple-layered. (Of course… I swear the drywall in this house will continue to haunt my life even after it’s all eradicated!) I was still all for slapping some thin 1/4” wood planks on the ceiling and calling it a day, but Nate thought it was probably not wise to add another layer of “stuff” to our ceiling. Plus, it was going to be difficult to tell for sure where the studs were to be able to nail into them. Also, they added part of our living room at some point long ago (obviously not after stippled ceilings went out of style), and the studs begin to run in the opposite direction in that area. All in all, we weren’t certain that adding something else to the ceiling was for the best. So, we began researching methods for removing ceiling texture.

Removing Ceiling Texture

We put some effort into our research, but not because it’s a complex process. Honestly, I think we were just dreading the mess and we were hoping to stumble across some sort of a unicorn solution that not many people had found and therefore wasn’t highly publicized. Spoiler alert: it doesn’t exist. Removing texture from a ceiling happens probably exactly the way you expect it will.

For the most part, we found two different methods for removing texture. From what we read, it seems like both are equally back-breaking, monotonous, and messy, so it’s just a matter of preference. You can either take a power sander and sand the texture off of your ceiling, or you can wet it and scrape it. Ultimately, we chose to wet it and scrape it, because although you still end up with a mess there is less dust in the air and you aren’t maneuvering a somewhat-weighty power tool over your head. My sander is kind of heavy, anyway.

We used a pump sprayer that we picked up at Menards to wet the ceiling in 2 x 2’ sections, allowed it to absorb for 2-5 minutes, and then removed the texture with drywall taping knives. Our living room area is somewhat large, so we had plenty of area to cover to perfect our technique. We found that letting the water soak in for longer than 5 minutes generally wasn’t helpful, even in areas with thicker coats of texture. Also, using too much water sometimes resulted in some torn drywall paper, so it was best to work with as little water as we could.

man in green shirt with pump sprayer, spraying ceiling


It took us 3 days to get all of the texture off of the ceiling, but that was with working at it in the evenings after the kids went to bed, and Nate working at it by himself all day on a Saturday. All in all, the texture removal process was messy and kind of a pain in the butt, but it wasn’t hard, and it definitely beat the next step: re-mudding and sanding.

ceiling drywall with half of the texture removed


Let me be clear: mudding and sanding walls is not fun. I used to think it was the worst thing in the world to do. I was wrong. Doing the same monotonous task over and over, but doing it above your head and having to stop every 10 minutes to move the step stool you’re standing on make ceiling mudding the absolute worst job I’ve done to date.

Mudding, Sanding, and Painting

The steps to getting a smooth finish on your ceiling are the same as getting a smooth finish on your walls. Start by applying thin coats of mud with your drywall taping knife (I like using one that is at least 12” wide or wider because it’s that much more space you can cover in one swoop), being careful not to over-work it. The thinner you apply it, the more quickly it dries, so it’s important not to continually work over it- if you try to make a pass over it when it’s partially dry, you’ll end up peeling parts of it up. Don’t fall into the trap of trying obsessively to get it completely smooth when you apply it. It’s okay if there are a few streaks or raised areas at the edges of your taping knife; those will sand out fairly easily. Once you’ve got your whole ceiling covered, let it dry and inspect your work. You’ll most likely need to do more than one coat of mud (we ended up doing three), and it’s always a good idea to lightly sand any problem-areas between mud coats.

Each coat of mud that we applied was mixed with water to varying degrees. Our first layer of mud was the thickest, with just enough water added to create more of a smooth, pottery clay-like substance. The second coat was thinned out even more, and the third coat was the most watery, almost like a pancake batter consistency.

By the time you get your final coat of mud on the ceiling, you should have a pretty good idea of where your trouble spots are, and it’s just a matter of sanding and applying touch-up mud as necessary. We finished the whole thing off with a good coat of primer (we used a stain-blocking primer since there was some previous water damage to the ceiling in one corner) and two coats of bright white ceiling paint.

smooth ceiling with can lights and gray walls


All in all, I’m so glad we chose to do this, but it’s one project I wouldn’t have minded hiring out. It took us (me) a solid week to get the ceiling mudded three times and sanded down to what I considered “good enough” (there are plenty of imperfections and I know exactly where they each are). I walk walking like an old lady for the duration of the project and probably a while after.

The good news, though, is we now know exactly what we’re doing when it comes to ceiling texture removal. The even better news is that there are no other rooms in my house nearly as large as my living room, so the worst of it is out of the way.

Over to you- talk to me about your ceilings! Are they textured, smooth, planked, tiled, or something else? Have you ever wanted to change them?

How to Keep a Clean House When You Live in a Fixer-Upper

One of the first things I learned early on when we moved to The Someday Home was that fixer-uppers require a little extra attention when it comes to making them feel clean and tidy. Living in a construction site, by nature, is messy. It’s dusty, dirty, cluttered, and you never know what one of the kids will pull out of one of the holes in your floor… not that that’s ever happened here >clears throat uncomfortably<.

Anyone who knows me will tell you that I am no domestic goddess. True, I love a clean home (actually, I love being barefoot, but I’m SUPER freaked out about crud sticking to my feet), but I love watching Netflix and crafting and playing with my kids more. I’m not at all interested in spending hours cleaning house… so, how do I do it? How do I live in a perpetual construction site without putting on shoes or losing my ever-loving mind? It’s simple: lower your standards. The end.

Ha! Just kidding… kind of. That’s definitely part of it. But there are some tips I’ve learned to live by to make it a little easier.

Safety first

Obviously, you want to make sure you always leave your home in a safe state for those who inhabit it. My kids have learned, through our constant renovations, that there are times where certain areas of our home are off-limits, and some areas that require boots and work gloves. We always try to keep our worksite contained as much as possible, and if a project is going to stretch over more than a weekend, we are sure to put away tools and dangerous items where the kids can’t reach them (because, y’know, kids…). It’s worth mentioning that sometimes it takes a little bit of extra planning to make sure we can complete our project in phases that will allow for clean(ish) living in between.

Buy a robot vacuum

eufy robovac

Me from 20 years ago can’t believe such a thing exists, but, by the grace of God and the fine folks at Roomba, it does. I had wanted one for years, but we never could justify it until we removed all the carpet from our home. Aint no way mama was going to be sweeping and mopping the entire house every day. We don’t actually own a Roomba, ours is a Eufy, but we love it all the same. We named her Rosie and she’s a proper member of the family. She runs around at least every other day, cleaning up crumbs, sawdust, and Dexter’s fur, mostly. Girlfriend even had a run-in with a turkey (and a whole pan of turkey drippings) thanks to Dexter last year around Thanksgiving time, and after disassembling her, cleaning her out, and letting her dry, she still runs like a champ. Somedays she’s my favorite member of the family.

Keep as much debris outside as possible

If I’m lucky enough to not have to do our dirty work directly inside our home, it usually means we’re working in the garage. Sawdust, insulation, and drywall crud can easily get tracked into the house, so it’s important to have a good rug right outside your door and to really enforce the “clean feet” rule. If you’re coming in my house and you’re not taking your shoes off, you damn well better wipe them off as good as you can. Barefoot Jessie is pretty easy going until she’s stepping on garage crud. I really like a thick, bristle-y rug for right outside my garage door.

Try to keep the mess to one area


This isn’t always possible, but when we’re working in the house, I try to contain as much of the mess to one room. All of the tools, supplies, and mess needs to stay in that room, at all costs. If we’re getting really dirty (taking out walls, cutting out the floor, etc.), we’ll cover the doorways with painters plastic, to try to contain as much mess as possible.

Stick to a regular cleaning routine

I’m rolling my eyes at myself as I type that. As much as I hate cleaning, it is a necessary evil, and probably even more so when you live in a fixer-upper. In addition to running Rosie 4-7 times each week, I really work hard to stay on top of all dusting, disinfecting, wiping, and scrubbing. I wish I had a magical solution to share with you guys here, but unfortunately, I don’t. The closest thing I have is an epic house cleaning playlist (with tons of Tom Petty and Fleetwood Mac) and a yummy-smelling scented candle. For some reason, cleaning doesn’t seem so bad to me if I can lose myself in a lilac field while belting out “Gypsy” as I’m bent over a toilet.

Accept that sometimes, it’s just part of living in a fixer-upper

As much as you try to fight it, sometimes it’s worth remembering that this is part of what you signed up for. There’s a reason that not everyone chooses to live in chaos and construction, but if this is what you’ve decided your family is all about, then you have to embrace what you cannot change, at least for a while. Nothing is permanent. Not even the duct tape holding my kitchen floor together, as repeated passes with a steam mop has confirmed. If you’re anything like me, clinging to the idea of what your home will be like someday is enough to get you through the rough patches.


How to Arrange Silk Flowers

If you don’t know by now, I (like 75% of the population), adore Joanna Gaines. I think everything she touches turns to magic- or at least, shiplap and rustic-chic perfection. Seriously, when I’m not sure what to do in a decorating situation, I ask myself WWJD… since I doubt Jesus cares how my bathroom is decorated, the “J” in that acronym stands for Joana, obvi. Anyway, aside from shiplap and white-on-white decor, JoJo is also known for her love of plants, and her technique of incorporating them into her decor schemes. And who can disagree with her? Plants, whether they’re flowers, herbs, or simple greenery, bring life and freshness to a room that inorganic decor items simply cannot. Unfortunately, I was born with two black thumbs, so living plants aren’t really in my wheelhouse, and fresh cut flowers don’t have a line in my weekly budget. Luckily, today we have many great life-like options for silk flowers, so you can enjoy the look of real plants without the hassle.

A floral arrangement is a great way to breathe new life into a room, or if you live in a house like mine, serve as a distraction from the chaotic renovation mess. I love to change out floral arrangements to reflect the season or decorate for gatherings or events in our home. Every once in a while, when I put on my fancy-pants, I’ll get fresh flowers, but silk flowers are my default. I like the ability to use them for multiple seasons and not have to worry about watering them.

I fell in love with silk floral arrangement 10 years ago, when I was a broke full-time college student/full-time administrative assistant planning my own wedding. As much as I would have loved to have real flowers at our wedding, it just wasn’t an option. Ever the diy-er, I set out to create my own bouquets for my bridesmaids and myself. Over the years, I’ve helped a friend or two prep bouquets for their own wedding, and I’m reminded every time of how much I love doing it!

I’m not a professional- if I can do this, anyone can. It’s simple, really:

Choose your flowers and greenery

This is usually the hardest part for me. I walk in with a general idea in mind, but once I see all of the options, I quickly get overwhelmed and lose sight of my original idea. Pinterest is really helpful here since you can go through and pin images of arrangements you like and work from that for inspiration. For smaller arrangements, I like to choose one flower to be the focal point, and then fill in around it with a couple of smaller flowers, and add greenery. If you’re familiar with floral arangement terms, you want a “thriller” (something tall), “filler” (something that can fill in any bare spots- baby’s breath is a common one), and a “spiller” (something to spill over the sides). I don’t adhere 100% to that every single time, but it is something I keep in mind loosley when I’m making my selections.

I purchased my flowers and greenery at Hobby Lobby while they were 50% off. They have a great selection, no matter what time of year it is.

coffee wire cutters silk flowers and vase


Clip your stems

The first thing I do is clip the stem on my focal flower. I line it up against the vase to get a general idea of where to cut it.


Next, I cut my “supporting” flowers down.


white hydrangeas

It won’t look right yet, but I go ahead and stick them in the vase anyway, just so I can get an idea of what I’m working with. You’ll notice I don’t cut them both at the same length. I like to vary the height just a little bit.

greenery


Next, I begin cutting the greenery down to size.

little white flowers

I just bought one stem of these pretty white flowers, because I knew a little bit would go a long way. I cut each small stem off of the larger stem so I could have a little more freedom as I placed them throughout the arrangement.

floral arrangement

One of the best parts about working with silk is that generally, they will be wired, which means you can bend them and shape them to your liking. I didn’t cut the greenery apart in the back, I just spread it out using the wires.

floral arrangement

It’s starting to come together! This time around, I decided to step outside of my comfort zone and add some cotton to this arrangement. Cotton stems are everywhere in decor right now, and I have to say, I’m really digging it.

floral arrangement

Arrange your stems

Once you get everything in your vase, keep playing with it until it looks right. I aim for general symmetry, while still keeping the overall look very free and organic.

I ended up having to cut apart some of the cotton stems to better incorporate them into the arrangement. I loved the look, but I wasn’t crazy about being able to see the fake stems through my jar, so I added a little burlap. Painted jars or galvanized buckets make great vases for arrangements, and then you wouldn’t have to worry about hiding your stems.

floral arrangement

I love love LOVE the cotton stems! I plan to use them again in a fall arrangement, but honestly, I’m not ready to let go of summer yet. What do you think? Are you a silk flower kind of person, or do you prefer the real deal?